Because many of these posts are a work in progress, I’ve created a German Freelance Visa Facebook group to help answer any individual questions as they arise. Please feel free to ask your questions there or in the comments below, and if you’ve successfully received your visa, please pass your knowledge along by helping to answer questions as well. Thanks and please join here!
The application form itself is probably one of the simplest parts of the application, but also one of the most intimidating. This form only asks for your personal information, a bit of family history, and what you intend to do while freelancing in Germany. However, the most critical part of the application form will be the freelancer title you choose, but we’ll get to that later.
You can find the form (in various languages) on the Visa Information/Appointment page, but I’ve also included the links here for convenience:
- German, English, French, Italian
- German, Greek, Turkish, Serbo-Croatian
- German, Spanish, Portuguese, Russian
I recommend you print out the form and complete/follow along as we go. You can read this a million times and I promise you’ll still come upon a section you’re a little iffy about, so let’s just do it together!
In the example pictures and PDF below, I’ve completed the form with fake information (in red) as an example and annotated with a few notes (in blue). Make sure you print out a fresh copy and fill out with your personal information, not this fake stuff!
Basics & Photo
Most of the application itself is rather straightforward personal information. It starts off with your name, place/date of birth, and passport information. Just fill this out as you normally would, but don’t forget about European date formats!

Also on this page is a box for the required biometric/passport photo. The photo can be taken at one of the old-school booths, often found in subway station entrances, or (so I’ve heard) at the appointment building itself beforehand (just get there really early, it takes at least 5 minutes to get through all the instructions). These are not the fun, take four photos with your friends and get them on a strip type booths. They are specifically meant for these official photos. If you use one of these, the machine will take you through all the dos and don’ts (in German but with pictures). If you’re paranoid though, the requirements are:
- 35mm x 45mm (seems to be standard)
- Front facing, look straight ahead/into the camera
- Light background (white just to be safe)
- Neutral expression. Closed mouth. Don’t smile.
- Don’t pull back your hair into a ponytail, etc. but don’t block your face either. When in doubt, down and behind your ears is safest. Use your judgment when it comes to bangs.
- Don’t cover your face in other ways (sunglasses, hats, etc.)
I took the machine print out of four identical photos and included it with my pack. I did not attach it to the box on the form, though I don’t think it would hurt if you did.
The last bit of this page asks for your passport/document information, residency, and marital status.

Family, History, & Address
The next section asks about your family. I’ve skipped the part including information about a spouse and children as these didn’t apply to me, but they are similar to the below and rather straightforward. Just fill out your parents’ information and carry on. If you’re unsure about any of this information and you can’t ask, I would just leave it blank.
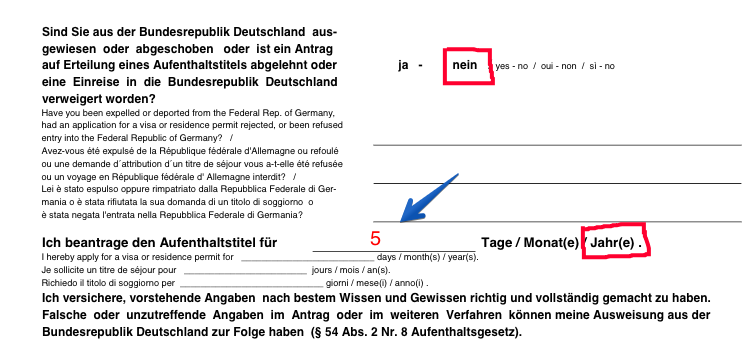
Following your family info, the application asks if you’ve been to Germany previously. If this is the first time you’ve been in Germany, you can circle no (nein) and move on. However, if you’re like me and you tried Germany on first, fill out your previous visit information to the best of your ability. I recommend getting exact dates if you can, though if you went to several places in the country on one trip, I would just include them in one line (e.g. Hamburg, Berlin, Munich). If you’ve been to Germany more than three times, don’t worry about fitting all your trips, just include the three most recent.

The last section of this page asks for your arrival information, address, and email. If you’ve been in and out of the country while waiting for your visa, I would include the most recent arrival date and origin. If you entered Europe through another Schengen country, it might be worth noting it in the “from” section just in case they look for the entry stamp. You could simply write something like “USA (via Denmark)”.
The next, “Registered on”, line is referring to when you registered your address in Germany, aka the Anmeldung (good overview on this at All About Berlin). This really should happen within your first two weeks in Germany. I don’t think they’ll say anything if it’s longer but better safe than sorry right? Below that is your address in Germany. This should be the same address on your Anmeldung form so make sure you’re registered at the correct address before your appointment. Don’t worry if you’re moving after the appointment, you can just register the new address then without impact to your visa.
Lastly, your email. That’s simple enough, right?
Work in Germany
Ok, this is the really important bit: why you’re in Germany and what you plan to do here. The first two relevant lines (purpose and employer) I was a bit confused on, but I didn’t get any questions/feedback from my interviewer, so I figure these answers were ok. This was also the first time I had to decide between writing something in English vs. German. When in doubt, go with German!! For “Purpose”, I wrote “live and work”, or at least that’s what Google Translate said these were. I also said my employer was “Self: Name (Freelance)” (again in German) and didn’t get any questions on either of these.
The most important item on the application is next: your Intended Employment. This is your self-assigned freelancer title that should be used consistently, as it appears on this form, throughout your application. This means on your CV, Letters of Intent, References, etc. the title you use on this line of the application should be used word-for-word. For some, this will be very obvious: Designer, Software Developer, Copywriter, etc. Others, like myself, will have a harder time coming up with this title. Ideally, you can pick something easily understandable so it’s not a discussion with the interviewer, however, if you’re like me and what you do doesn’t fit neatly into a box, pick something that is concise and covers what you do, but not every job in the book.
The reason this title is so important is because it will be written directly on your visa and as a result, the only type of work you will be eligible for. If you write Designer, you cannot work as an Uber driver. If you write Spanish Teacher, you cannot teach English. This title defines what you’re applying for and what you’ll be working on, so spend some time on it if it’s not obvious.
In my case, I went with “Tech(nology) & Operations Consultant”, what’s written on the example form below. I originally wrote this (or at least attempted to) in German, but my interviewer didn’t understand what I was getting at, and asked me to write it in English (which she spoke). She also wrote the title in English on my visa. I would expect this is not at all typical, so don’t expect to be able to craft a title in English. I would recommend finding some German-speaking friends to come up with a better translation than I did if you find yourself in a similar situation.

The remaining fields ask for your past training, means of subsistence, health insurance, and criminal history. In my case, I went to college for Computer Engineering, so this ended up as my “profession for which trained.” A side note/theory on this one: because I’m coming in with a background in engineering, one of the desired professions in Germany, I may have gotten a slide on things like an ambiguous and non-German freelancer title. This is just a theory, but if you have such a background, it doesn’t exactly hurt to make a note of it.
For means of subsistence, this essentially means how are you financially planning to survive, both now (before the visa) and once you get it. My answer was savings and future work, though I’m not super confident in that exact translation anymore. However, I didn’t get any questions about it so…
The last questions are straightforward yes or no. Hopefully, you can answer yes to health insurance since this is one of the requirements for the visa and no to criminal history. I don’t think a yes answer to criminal history will necessarily sink you, but it’s probably worth some additional research.
Visa Length
The last ambiguous portion of the application is how long you apply for. I originally wrote one year on my application and the interviewer recommended I write five. Five years is the maximum, so you will either get the five years outright or as long as the interviewer deems appropriate/possible. Based on my savings and background (according to my interviewer), I ended up receiving the visa for a two-year term. This doesn’t mean I have to leave after two years, just that I will need to renew the visa at that time. You can receive the freelancer visa for a total of five years, including renewals.
Example Application
Want to see the whole application in one shot? Here is the example application I completed and used in the screenshots above. Let me know if you had better answers to some of the standard questions and what your experience was like. Have any specific questions? Don’t forget to join our Facebook group here!
Next Up: Capital Budget & Profit/Loss Forms
Previous: Booking the Appointment


